WIFI Extension
Using a Router (WRT54G)
In general, there are at least two reasons
why people want
to extend WIFI. The first situation is
where your reception is marginal. All
you need in this case is a PCMCIA card and an antenna.
If on the other hand, you want this to be a
more permanent
situation, you need different equipment.
This is often the case when you want to connect two buildings
together. One has an Internet
connection and the other does not. You
may choose to have several computers in the building that is being
connected,
so you need a wired or a wireless network to connect them all together.
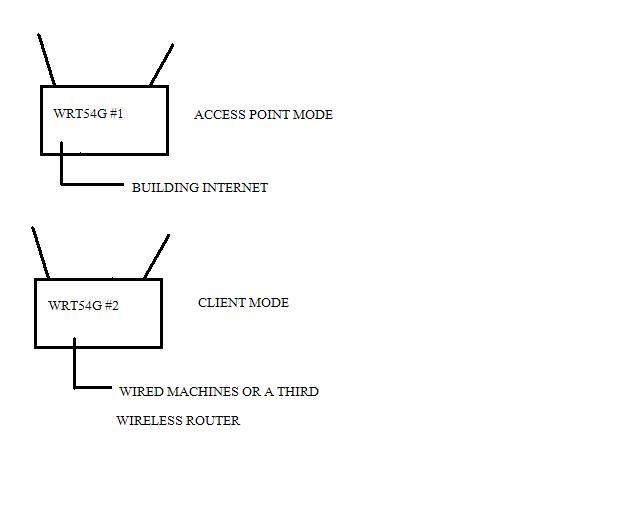
When I started working on this type of a setup, there were no wireless bridges or any other such item that was in my price range. I decided to use some of the aftermarket software written for the WRT54G, WRT54GS, or WRT54GL.
A typical system is made of source access
point and a
client. Many of today’s routers do not
support the client mode so that is why you need aftermarket software. My favorite is DD-WRT #23.
It works on version 1-4 of the WRT54G and
all of the others listed above. It does
not work on a WRT54G version 5. If you
are using a DD-WRT be sure to check the version number as you will
create a brick
if you update with the wrong version of software. The
aftermarket software only needs to be run on the client end
as the standard software works fine on the access point end.
The WRT54 series, has a software update
feature under the
administration button. You need to
download the DD-WRT software and expand that into a directory. You then do a browse in the update screen
and point to the new version of software.
Tell it to update and be sure to give it enough time to finish. Wait for about two minutes after the lights
become stable.
Connect the router #1 to the internet in the
first building
using one of the LAN ports or to a Cable or DSL box using the WAN port. Use a laptop or other computer to make sure
it is working. The normal IP address
will be 192.168.1.1 so if this will conflict with something else in the
existing network, it may need to be moved.
For now lets assume that it is okay.
You log into these routers by using a username of root and a
password of admin.
The DHCP server should be running
on this Router.
Router #2 will be setup by going to the
Wireless page. Change
the Wireless Network Mode to Client.
You should also set the SSID to the same SSID as on the source
router. Be sure to do a save after each
change.
The second change will be made on the
Setup/Basic Setup
page. To keep data from getting
confused, you need to create a new subnet, which will have different IP
address
than the access point router. I change
the Local IP Address to 192.168.1.193 so that I am out of the way of
the other
network. To create a subnet you set the
Subnet Mask to 255.255.255.192. This
makes everything above 193 on a new subnet.
The starting IP address for the DHCP server should be set to
something
like .195. You now do a save and the
computer that you have connected may get confused.
You need to do a ipconfig /release and then a ipconfig /renew in
a
dos box. Once this is complete you
should be able to do a ipconfig/all and see that your new IP address
will be
something like 192.168.1.195. If the
computer
will not connect back up try a reboot.
If that does not work then you must have set something wrong. A 30 second reset on the router will put it
back to factory settings so you can start over. Here are
the router screens that need to be changed and what they should look
like:
Now lets look at the Wireless page changes:

Router #2 should now be connected, so to
check this out, go
to the Status tab and then click on Wireless.
Do a site survey and make sure that the two routers can see each
other. If not you will need to add an
external antenna. If they can see each
other okay, do a Refresh on the Wireless page and check the data to
make sure
it has connected correctly. You should
see that it found a DHCP server. You
can now move back to the LAN tab and do a refresh.
The new DHCP server should now show up.
Your new network is now up and running. If you are going to need wireless in the
second building, connect up another router to one of the LAN ports. Standard software should work just
fine. Change the radio channel on the
router to be at least two above or below the channel on the other two
routers. You can connect wired computers
to the LAN
ports also.
You can now setup your security setting if
needed.
If things did not work you need to do some
trouble
shooting. Here is an outline:
1.
My normal
trouble shooting requires a laptop which I connect to each router and
check for
the correct setup.
2.
Connect to one
of the LAN ports on router #1. The
router should give you an IP address, the correct gateway, and the
appropriate
DNS server. This can be checked using
Ipconfig/all. No special setup should
be needed to make this work.
3.
Connect to one
of the LAN ports on router #2. Go to
the status page and choose the Wireless tab.
Check to see that you are connected.
The SSID should show
up and it should show as connected.
If not try a refresh. If it still
does not connect, go to the wireless
survey and see if the access point you want to connect to is
shown. If not you need to move the routers
closer
together or add an antenna.
4.
Once you get
it connected, check the LAN page. A
refresh there often fixes things also.
It should now show the correct IP address, DHCP server and DNS
server. Once
this shows up correctly,
your system should be running correctly.
5.
The above steps can be done from the wireless connection also if
the the wireless
configuration has not been turned off.
6.
A few other trouble shooting tips are listed below:
a. Tracert can
often help you understand where data is going wrong.
Use it to list all systems between you and some known good IP
address.
b. Ping is often
used to see which routers can be seen from any point.
c. At times a
router that has no DHCP server running will not connect to a laptop
which has a 169.xxx.xxx.xxx IP address. You
can fix
this situation buy setting a fixed IP address on the laptop to
be within the same range as the router. The
default
for any of these routers is 192.168.1.1 after a reset.
I often us a fixed IP address of 192.168.1.9 for the laptop.